MSW Editor Menu Overview
Please note: this article is only applicable to websites built after November 2018.
This article provides an overview of the editing environment. You can click each subject to be taken to a detailed overview.
Considerations/Prerequisites
MSW2 is completely different to the original My Surgery Website. If you have used the original My Surgery Website we highly recommend reading this article which explains what to expect
Main Menu

- Click to expand/contract the main editor menu
- Log out of the editor
- Preview the site
- Access the help centre
- Website Functionality
- Prescription Settings
- Homepage Manager
- Page Manager
- Menu Manager
- File Manager
- Template Picker
- Style Picker
- Colour Scheme
- CSS Editor
Website Functionality
This is where you edit some generic settings for your website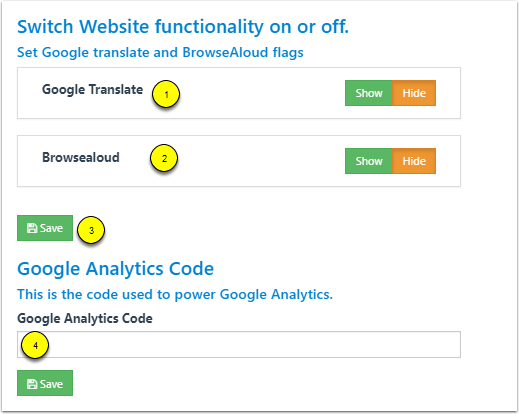
- Toggle Google Translate functionality
- Toggle BrowseAloud functionality (note: you need a valid subscription with BrowseAloud. More info here).
- SAVE any changes to the above
- If you have a google analytics account, you will have a tracking ID. This number will be in the format UA-XXXXX-Y and will be in any code snippets provided by Google Analytics. Copy this ID and place it into this field. Press SAVE
Prescription Settings
Coming soon.
Homepage Manager
The Homepage Manager allows you to set the page you want to appear as the homepage.
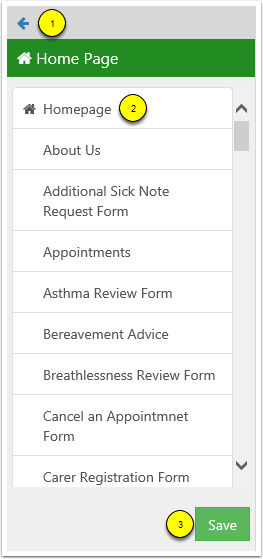
- Return to the main menu.
- Page list: the page with the home icon next to it is currently set to the homepage. To change it simply select the page you wish to use.
- Click the Save button.
Page Manager
From the page manager you can add pages, delete pages and navigate directly to pages.
- Click here for the full article on creating a new page.

- Return to the main menu.
- Create a new page.
- Filter the different page types.
- Type the name of the page you wish to find.
- Press to search for the page name.
- Press to clear the filter and show all pages.
- Page name.
- Click to go to the page. If the chain link is broken it means there is no menu item pointing to this page.
- Press to DELETE the page.
Menu Manager
Please note: To edit the Important Menu or Main Menu please contact support.
The menu manager is where you can add, create and edit menus.
- You can read the full article on the Menu Manager here.
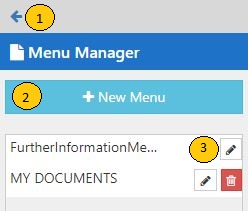
- Return to the main menu
- Add a new menu
- Edit Menu
File Manager
The file manager is where you upload files and manage the files you have already uploaded.
- You can read the full article on the File Manager here.
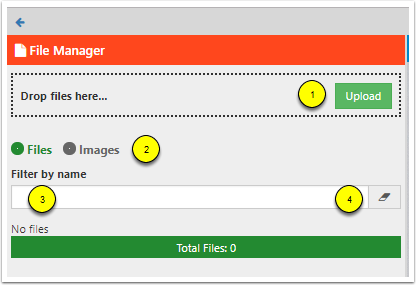
- Click here to upload a file or image to your website. (You can also drag and drop the files into the box).
- Select to view files or images.
- Search for a file or image by name.
- Press to clear the filter.
Template Picker
The template picker is where you pick the primary template for your website.
- You can read the full article on the Styling your Website here
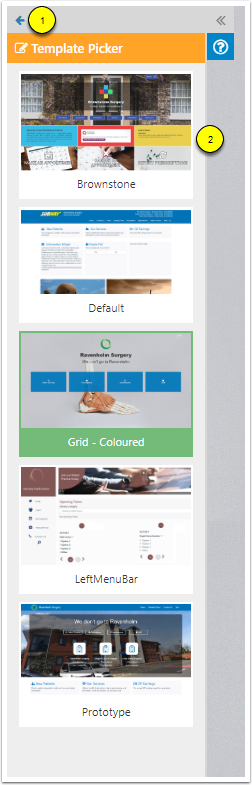
- Return to main menu.
- Select a template you like the look of. You can customise your template by using the tools outlined below.
Style Picker
The Style Picker is where you can change the appearance of widgets, buttons and menu items. The differences are subtle but can make a big difference to how your website looks.
- You can read the full article on the Styling your Website here.
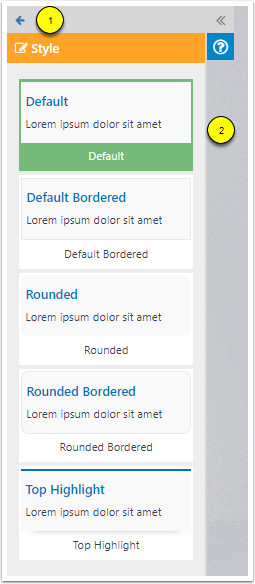
- Return to the main menu.
- Available Styles: click on the option you most prefer. If you hover over the option you get the choice to preview or make it live.
Colour Scheme
This is where you can customise the colour scheme for your website.
- You can read the full article on the Styling your Website here
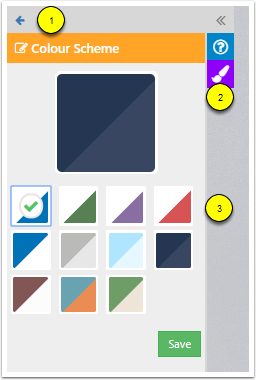
- Return to the main menu.
- Preview the colour scheme.
- Select a colour scheme that is most appropriate for your brand.
CSS Editor
Advanced use only. Most practices will have no need to use this. If you are not familiar with CSS please do not touch this as it can break your site.
If you wish to make changes to the CSS on your site (or if you have a designer that wants to make some changes) then you can place the desired CSS in here. This gives you design control over almost every aspect of your site.
- You can read the full article on the CSS Guidelines here
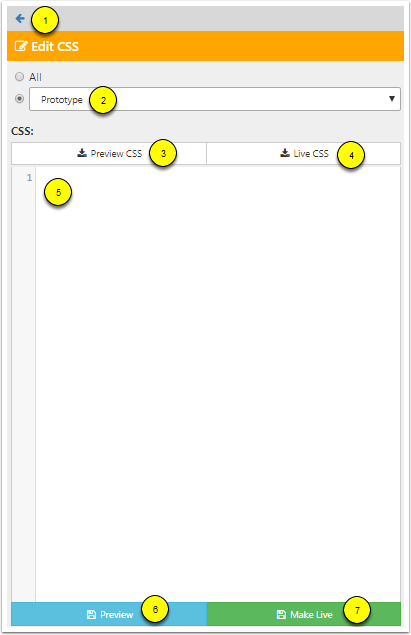
- Return to the main menu.
- Select the template you wish the changes to apply to. You can select ALL if you want the changes to be applicable across all templates (handy for generic items like logos).
- Click to preview the CSS changes you have made.
- View the existing CSS that has loaded with the site.
- Enter your custom CSS in here.
- Preview the changes you have made.
- Make the changes live.