Important Notes:
- This articles for is specifically for FPMS Pro Admins
- In order to use Absence Manager you need to use the Schedule tool.
- Absence Manager, Schedule and Checklist: you can only use these tools if user IDs are assigned to staff members. Before proceeding please ensure all users IDs are assigned to staff members (See this article: User Admin)
- The layout of Absence Manager will change based on your permissions.
Contents
- Overview
- Getting Started (Configure Absence Manager)
- Types of absence available
- Booking Absence (Admins)
- Booking Absence (Staff Members)
- Who can Approve Absence
- Approving Absence
What is Absence Manager
Absence Manager is a diverse, all encompassing tool for handling all staff absence, whether it be sickness, holiday, time in lieu, overtime, maternity leave, etc.
- Staff apply for leave.
- Managers approve it.
- You can book an absence for yourself or another member of staff.
- Absence manager is fully responsive so can be used on mobiles and tablets.
Where Do I Find Absence Manager
Once logged on to FPMS Pro, click on the TOOLS menu and select ABSENCE MANAGER.
What else?
Absence manager integrates with Schedule and Holiday Manager. If all your staff work the same shift pattern then you won't need to use schedule - if not then you will need to configure Schedule to match the shift patterns.
Getting Started (Configure Absence Manager)
You will need to configure Absence Manager so it can be used by all staff. When you first log in to Absence Manager a configuration wizard will open automatically. If you need to access the configuration settings at any time just click on the cog icon in the top right of the screen.
Step 1: User Management
Absence Manager, Schedule and Checklist: you can only use these tools if user IDs are assigned to staff members. Before proceeding please ensure all users IDs are assigned to staff members (See this article: User Admin).

- The system will identify which user IDs do not have associated Staff Members
- Click the Manage Users Now button to go to the section where you can associate user IDs to Staff Members (see this article for more information on managing users).
Step 2: Set Up Staff Schedule

In order to accurately calculate the remaining holiday allowance Absence Manager must understand the shifts that individuals work. To create this information, you will need to populate the staff Schedule by clicking on (1). Learn about Staff Schedule here
Step 3: Set Up Staff Schedule

Import all available absences from the previous version of Absence Manager. Any errors or conflicts will be reported once the import is complete.
Step 4: Holiday Allowance Allocation
Next allocate the holiday allowance for each staff member.
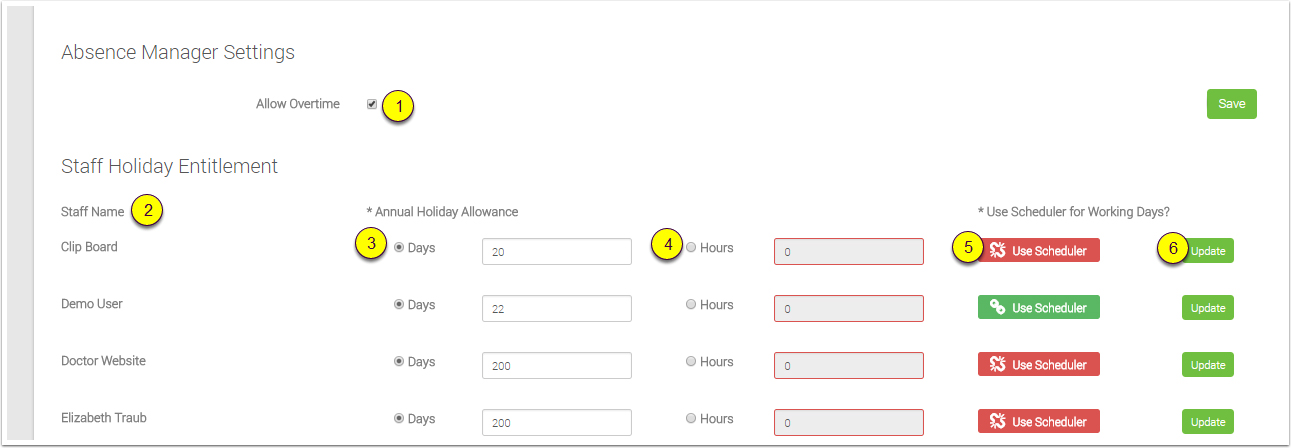
- Allow overtime: Tick if your practice allows overtime. For example, if staff can claim back time in lieu.
- List of staff.
- If staff member's leave is allocated in days then enter the number of days leave allowed.
- If staff member's leave is allocated in hours then enter the number of hours leave allowed.
- Use the scheduler: Leave will be calculated based on the shift patterns. For example if a staff member works Mon-Wed but takes a Wed off then although they only will be in work for 2 days they will only use 1 day of leave.
- Press Update to apply any changes.
The following types of absence are available:
- Holiday
- Lieu Time
- Compassionate
- Maternity
- Other
- Overtime
- SicknessStudy leave
Time in Lieu and Overtime
Absence Manager can record Time in Lieu (TiL). How much TiL a staff member has accumulated will be determined by how much Overtime the staff member has booked. Overtime is booked in Absence Manager. Although Overtime is not strictly an absence, it is handled in the Absence Manager as it linked directly to TiL which is an absence.
Admins can book an absence both for themselves and other staff members. In this section, we show you what the screen looks like for an admin. If you want to see how it works for an individual staff member then proceed to the next section
Open the booking screen
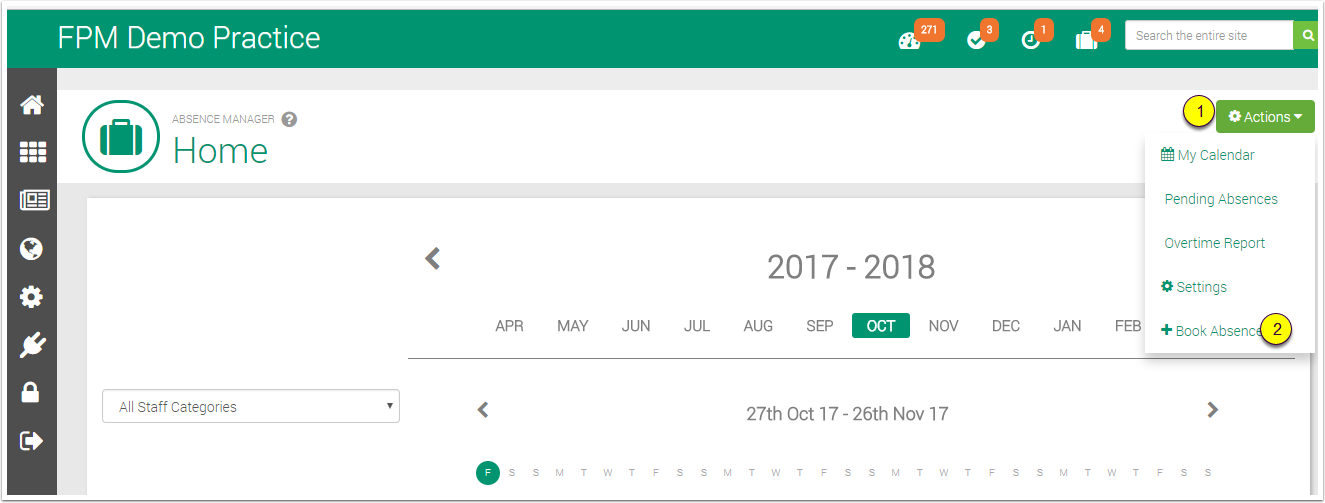
- Click on Actions Menu
- Select Book Absence
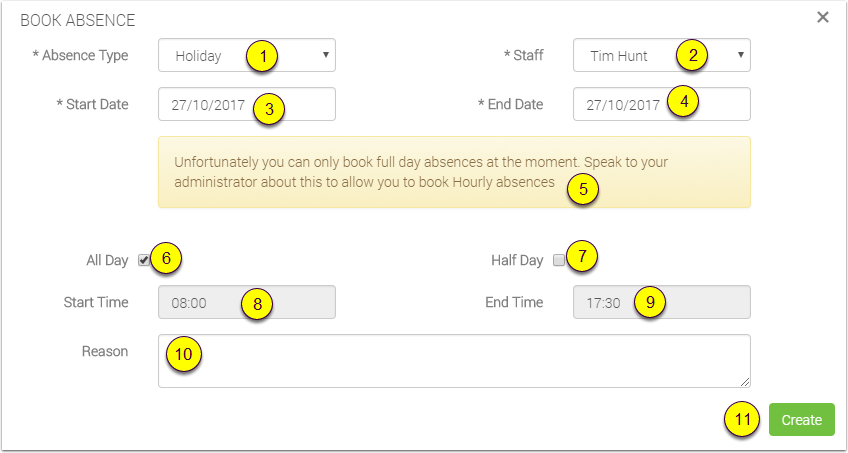
- Select the absence type
- Select the staff member
- Start Date
- End date
- Important Note For admins: You will see this warning if you are set up to book holidays as days and not hours. At the moment, you won't be able to book an absence for an individual that is configured differently to you.
- Select if absence is classed as ALL DAY
- Select if absence is classed at HALF DAY
- This option is available only if the staff member is configured for hourly absence
- As above
- Enter reason for absence (optional)
- Click to save the absence
Half Days
When you click on the half day option the options will change to

Booking Absence (Staff Members)
The most common scenario is that staff will book their own Absence. It is a prerequisite that the staff holiday allowance is configured in the Absence Manager. Holiday allowance can be assigned in days or in hours depending on the working patterns. If staff work a specific shift pattern then the this should be defined in the schedule.
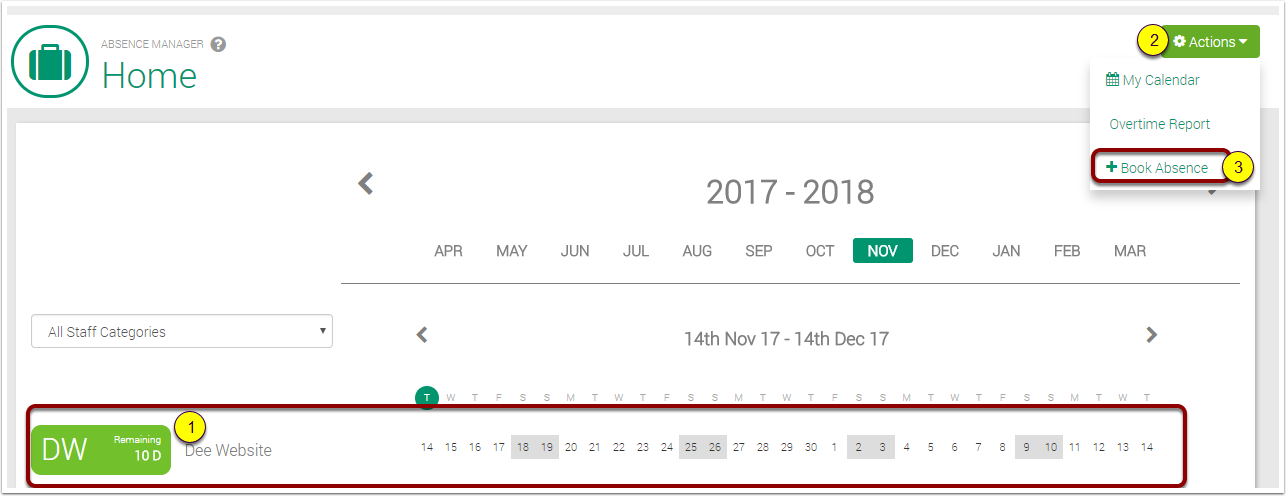
To book an absence the staff member should go to the Absence Manager in the tools menu.
The screen below will show. The Staff member who is logged in will appear a the top highlighted in green (1) . The staff memebr nees to clik on ACTIONS (2) and then select BOOK ABSENCE (3)
The following screen will appear

- Select the type of absence you are booking
- Start Date
- End Date
- This message will appear if the user is not configured to book hourly absence (if this does not apply then it is nothing to be concerned about).
- Select if absence is All Day or...
- Half day (note if half day selected teh screen will change to allow selection of AM or PM).
- Enter start and...
- End times if applicable. These fields are optional.
- Provide a reason for the absence (optional)
Click CREATE and you are done.
When staff request leave it needs to be approved by a colleague. Permissions of who can approve leave (and for what Staff category) are assigned on the on the "Absence Approvers" page.
Important Notes:
- This only works for staff that have been placed into categories. An unassigned member of staff will be able to request an absence but no one will be able to approve their leave.
- Approvers can only see the absences for the categories that they have been assigned to. EG if the approver is not assigned to doctors then they will not see the doctors absences
Absence Approvers
To set up staff to approve absence, go to ABSENCE APPROVERS section in the Absence Manager settings. Here's how:
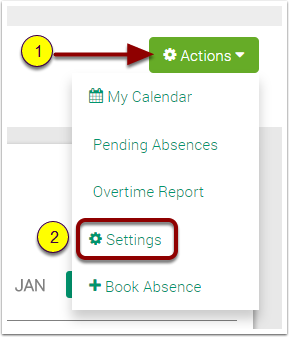
- Load Absence Manager and click on ACTIONS
- Select Settings
Once the settings load:
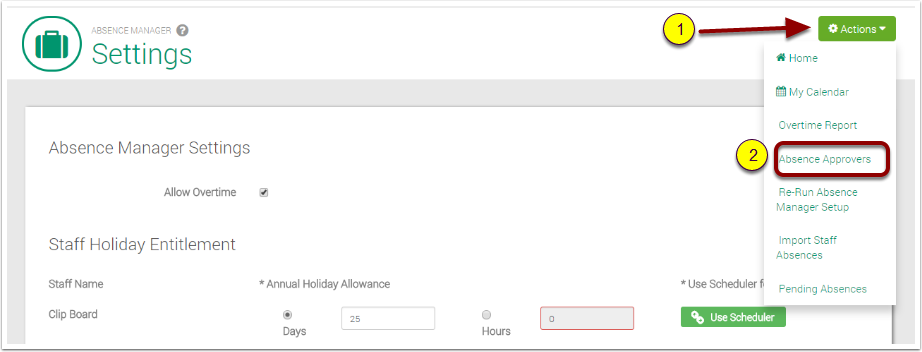
- Click on ACTIONS again
- Select Absence Approvers
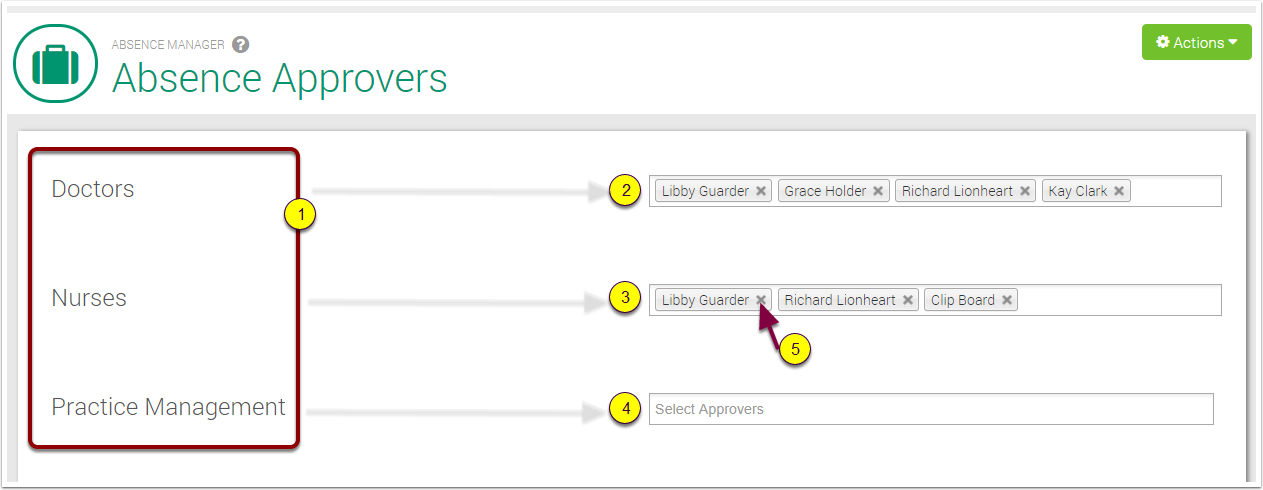
On this page, you will assign who has permission to approve leave for each of the Staff Categories you have set up (1). Simply start typing the name of the approver in the relevant field (2,3,4) and select the person from the list that appears. Should you wish to remove a name, simply click the X next to the name (5). NOte the page will auto save so there is no save button.
Once the "absence approvers" have been set up (above) they can then approve leave. Note: Approvers can only see the absences for the categories that they have been assigned to. EG if the approver is not assigned to doctors then they will not see the doctors absences
Pending Approvals

When you log on there will be a suitcase icon at the top with the number of pending requests. Click the icon and the following pop up will appear. If you are a Level 4 admin you will see all requests but you can still only approve the leave for the categories you have permission to approve.
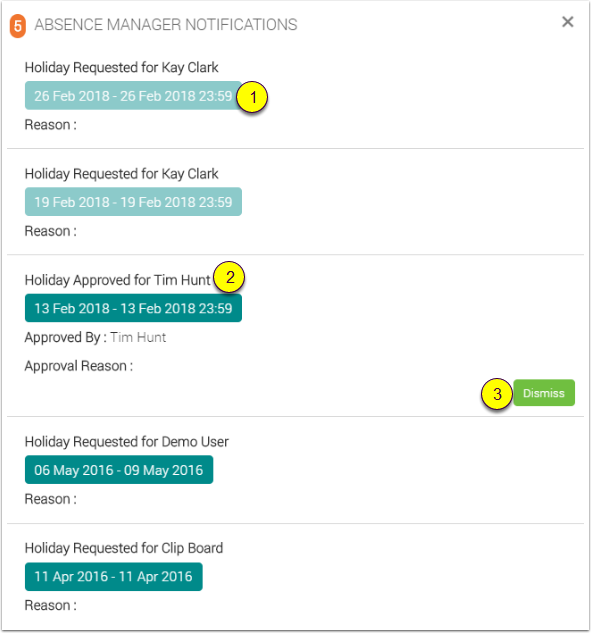
- Pending requests - click here to go to the approval page
- If you have personal leave requested then it will show here as well. If you don't wish to see it any more just hit Dismiss (3)
When you click on the leave the following Approval Window will open the absence manager

- Days the requester has remaining
- Details of leave
- Click to Approve Leave
- Click to Reject Leave. If you reject leave you will need to provide a reason.